
What is GST return?
GST return is a statement or a document that contains all the details of your sales, purchases, tax collected on sales (output tax), tax paid on purchases (input tax), adjustments thereof and the resulting tax liability (money that you owe the government). On or before filing the GST returns, you will need to pay the tax liability, if any.
Who needs to file GST return?
Every registered person is registered to file GST returns. The type of return varies according to the nature of their business or transactions. For e.g. A registered person under Composition scheme will have a different type of return than a regular registered person.
Types of GST Returns and Due dates:
There are various types of returns under GST like GSTR-1, GSTR-3B, GSTR-4, GSTR-5, GSTR-5A, GSTR-6, GSTR-7, GSTR-8, GSTR-9, GSTR-10, GSTR-11, CMP-08, and ITC-04. However, all the types of returns do not apply to everyone. Taxpayers file returns based on the type of taxpayer or type of registration obtained.
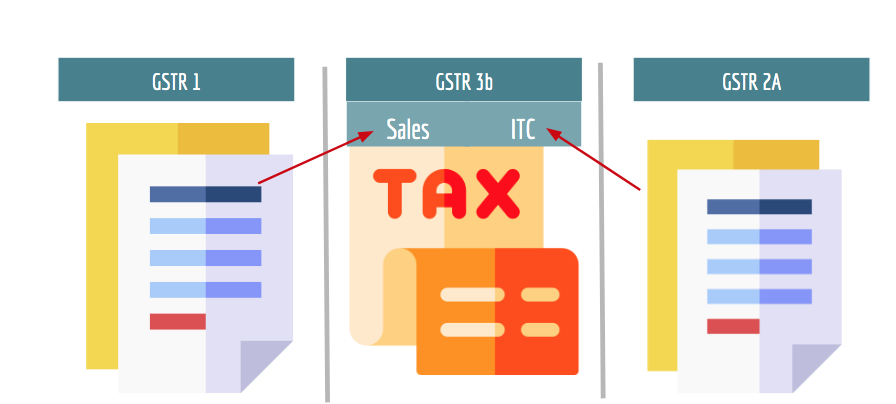
GSTR-1 and GSTR-3B (Also GSTR-2A & 2B )
Practically, the most important returns are GSTR-1 and GSTR-3B, which we will learn in detail. Please note that GSTR-2A, GSTR-2B are not returns but a statement which is auto generated by the portal.
GSTR-1 (outward Supplies) / IFF
GSTR-1 is the return to be furnished for reporting details of all outward supplies of goods and services made.
In other words, it contains
the invoices
and debit-credit notes raised
on the sales transactions for a tax period. GSTR-1 is to be filed by all normal
taxpayers who are registered under GST, including all the casual taxable persons.
Any amendments to sales invoices made, even pertaining to previous tax periods,
should be reported in the GSTR-1 return
by all the suppliers or sellers.
Due Dates
The filing frequency of GSTR-1 is currently as follows:
(a) Monthly, by 11th of every month:
(b) Quarterly, by
13th of the
month
following every quarter:
Is QRMP scheme mandatory for those whose turnover is less than Rs.5 crores ?
GSTR – 2A (ITC data - dynamic)
GSTR-2A is a view-only
dynamic GST
statement relevant for the recipient
or the buyer. It contains the details of all inward supplies
of goods and services i.e., purchases made from GST registered suppliers during
a tax period.
The data is auto-populated based on data filed by the corresponding suppliers
in their GSTR-1 returns. Further, data filed in the Invoice Furnishing Facility
(IFF) by the QRMP taxpayer, also get auto-filled.
Since GSTR-2A is a read-only statement, no action can be taken on it.
However, it is referred by the buyers to claim an accurate Input Tax Credit
(ITC) for every financial year, across multiple tax periods. In case any
invoice is missing, the buyer can communicate with the seller to upload it in
their GSTR-1 on a timely basis.
GSTR-2B (ITC data - static)
GSTR-2B is again a view-only
static GST
statement important for the
recipient or buyer of goods and services. It is available every month, starting
from August 2020 and contains constant ITC data for a period whenever checked.
ITC details will be covered from the date of filing GSTR-1 for the preceding
month (M-1) up to the date of filing GSTR-1 for the current month (M). The
return is made available 1 day after the dues dates of GSTR-1 or IFF. Hence on the 14th of every month is
the ideal
date, giving sufficient time
before filing GSTR-3B, where the ITC is declared.
GSTR-2B provides action to be taken against every invoice reported, such as to be reversed, ineligible, subject to reverse charge, references to the table numbers in GSTR-3B.
GSTR-3B (Summary Return)
GSTR-3B is a monthly
self-declaration return to be filed, for furnishing
summarised details of all outward supplies made, input tax credit claimed, tax
liability ascertained and taxes paid.
GSTR-3B is to be filed by all regular taxpayers registered under GST. The sales
and input tax credit details must be reconciled with GSTR-1 and GSTR-2B every
tax period before filing GSTR-3B. GST reconciliation is crucial to identify
mismatches in data that may lead to GST notices in future or suspension of GST
registration as well.
The
filing
frequency of GSTR-3B is currently as follows:
(a) Monthly, 20th of
every
month- Registered
persons, who are
not under the QRMP Scheme.
(b) Quarterly, 22nd of the month following the quarter for category 1 States and 24th of the month following the quarter for category 2 States
Other Forms - At a Glance: